created march. 6, 2002
| <== Alle Maya-Befehle in diesem Buch - Alle! In Deutsch! |
Basic things you should know (and maybe never dared asking).
Grundsätzliches, was Sie wissen sollten (aber vielleicht nie zu fragen wagten)
|
Is there a nice layout for sculpting a surface? |
Gibt es einen guten Fensteraufbau zum interaktiven Verformen von Flächen? | |
|
|
|
|
Yes there is! |
Na klar! |

|
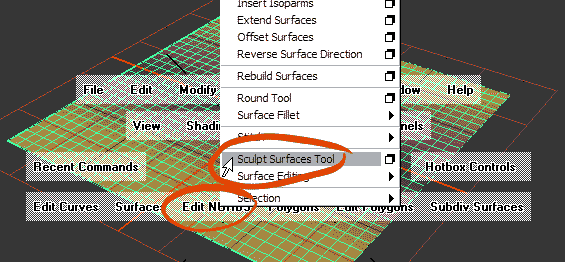
Create a piece of geometry which you want to sculpt. The illustration above uses a nurbs plane with lots of isoparms. With the surface selected choose F3, Edit Nurbs > Sculpt Surfaces Tool . |
Erzeugen Sie ein Stück Geometrie, das Sie mit dem Sculpt-Werkzeug (und am besten einem Grafiktablett) verformen wollen. In der Abbildung oben ist es eine Nurbsfläche mit vielen Isoparms. Wählen Sie die Fläche aus, und rufen Sie über F3, Edit Nurbs > Sculpt Surfaces Tool den Sculpt-Befehl auf. |
![]()
|
The cursor changes its shape to a brush. You can see the Sculpt Surface Tool icon on the left of the screen. But where are the tool settings? Most users choose the option box of the Sculpt Surfaces Tool command which brings up the Tool Settings in an extra window cluttering the view. With the following click we get to the same result - without clutter: |
Der Cursor nimmt die Form eines Pinsel an, und am rechten Bildschirmrand erscheint das Icon des Sculpt-Werkzeugs. Aber wo sind die Einstellungen des Werkzeugs?
Die meisten Anwender nutzen dazu die Optionsbox des Sculpt Surface Befehls und lassen damit ein Fenster mit den Werkzeugeinstellungen aufspringen, das sich über alles andere legt. Wir gelangen zu diesem Fenster, ohne diese Behinderung des Blicks: |
![]()
|
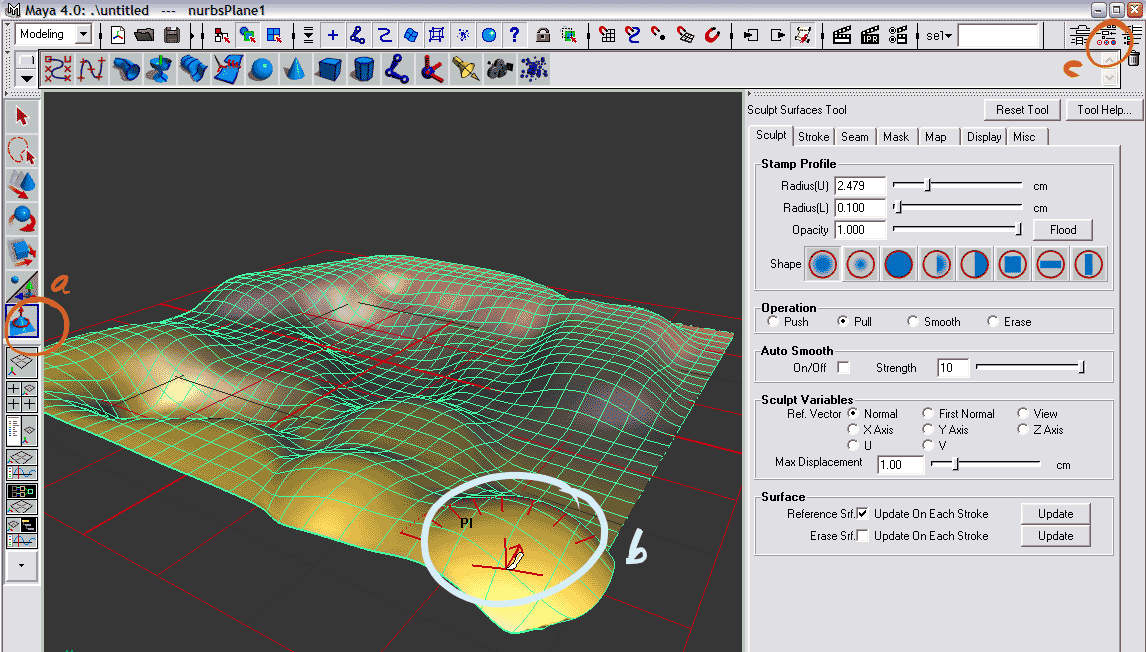
At the top right of the Maya window you see three icons. Clicking the middle one brings up the Tool Settings (of whichever tool you chose in the first place). The settings occupy the right section of the screen without cluttering your view of the object you want to sculpt: |
Am oberen rechten Rand des Maya-Fensters sehen Sie drei Icons. Der Klick auf das mittlere platziert die Einstellungen des gerade gewählten Werkzeugs (in unserem Fall des Sculpt Tools) auf angenehme Weise auf dem Bildschirm, ohne das Objekt, das Sie modellieren wollen, zu überdecken: |

|
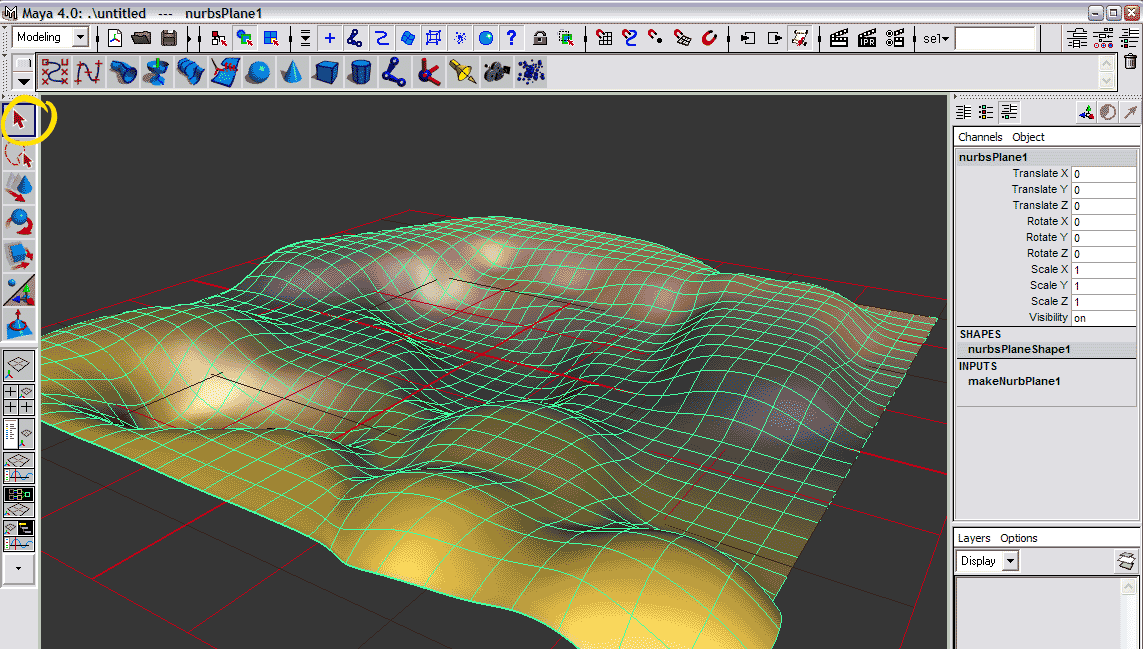
a) indicates the tool you're currently working with, b) lets you interactively sculpt the surface, c) is the icon which gave you this nice layout. Of course, after finishing modeling you want to return to the previous layout. Just click on the icon at the top right of the screen (above the trash can)! You can easily exit the tool by chosing another one or clicking on the arrow on the top left of the screen as you can see in the illustration below. |
a) zeigt Ihnen, mit welchem Werkzeug Sie gerade arbeiten, b) lässt Sie die Fläche interaktiv verformen, c) ist das Icon, das Ihnen dieses effektive Fensterlayout bescherte.
Natürlich wollen Sie anschließend zum vorigen Layout zurückkehren: Klicken Sie dazu einfach auf das Icon ganz oben rechts, über dem Papierkorb. Um das Werkzeug selbst zu verlassen, klicken Sie auf ein anderes, etwa den Pfeil am linken Bildschirmrand. (Siehe die Abbildung unten). |

|
Final Note. The change of layout in this mini tutorial shows you how to avoid desktop clutter of windows overlapping each other. All tools in Maya have their settings but most of them don't need to be fine tuned all the time while working with them. In these cases a quick change in the tool's option box is the preferable method. |
Abschlussbemerkung.
Mit diesem Minitutorial haben Sie ein Beispiel für effektiven Layout-Umbau in Maya. Alle Werkzeuge haben ihre Einstellungen (Tool Settings), aber die meisten müssen nicht während der Arbeit laufend fein nachgestellt werden. In solchen Fällen ist die Optionsbox des Werkzeugs - das kleine quadratische Icon nebem dem Befehl - das effektivere Weg. |