Monday, November 11, 2002
| Contents
Ramp Shader, Mental Integration, New Smooth, Smooth Proxy, Shelves Orgy, Snap Align, Floatin' On the Ocean, Wedge Faces, Cycling the Fluid Planet, Subdivs to Nurbs, A Glassy Fluid, Solid Fluids, Let's Snap Together, Volume Light, Bevel Plus, Oceans, A Fluid explosion, a 2D Fluid gas, the PolyCut and Poke Faces Tools
|
|
|
Inhalt
Ramp Shader, Mentale Einbindung, Neue Weichheit, Smooth Proxy, Shelves Orgie, Einrasten auf eine Ebene, Ozeanfahrt, Das Keilwerkzeug, Umkreisung des Gasplaneten, Subdivs to Nurbs, Gas wie Glas, Feste Gase, Let's Snap Together, das neue Raumlicht, Bevel Plus, Ozeane, eine Gasexplosion mit Fluids, ein 2D-Gas, das Polygon-Messer und der Poke Faces Befehl
|
| This page was getting longer and longer - too long, I know, I know. Consider it a diary of my first encounters with Maya 4.5, based on the July 2002 Maya 4.5 Early Access Beta 3 CD. The final release came out in october 2002.
For viewing the avi-animations you need a current divx codec which you can get from www.divx.com for example.
BTW: My Exploring Maya 4 - 30 Studies in 3D book is 100% compatible with Maya 4.5
|
|
 |
|
|
|
Diese Seite wuchs und wuchs und wurde viel zu lang, ich weiß! Ein Tagebuch. Sie wirft Schlaglichter auf Maya 4.5, dessen Beta 3 Version ich ab Juli 2002 testete. Auf dieser Seite finden keine Tests im strengen Sinn statt; ich haben einfach ohne großen Aufwand Neuigkeiten des Programms aufzeigen wollen, nichts weiter. Ein ausführlicher Test steht in der Ausgabe 4/02 der Digital Production.
Um die avi-Animationen abspielen zu können, brauchen Sie einen divx-Codec, wie den von www.divx.com etwa.
Mein Maya 4 Sketches-Buch ist übrigens 100% kompatibel mit Maya 4.5.
|
[19]Ramp Shader
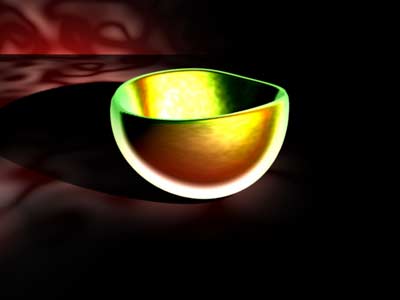
| The new Ramp Shader is not just another shader for creating a cartoon look - it's a paradigm shift in terms of interface: Its attribute editor has a totally new look which will probably sooner or later enter the editor of other shaders, too. It gives you nice sliders and gradients for ineractive adjustments.
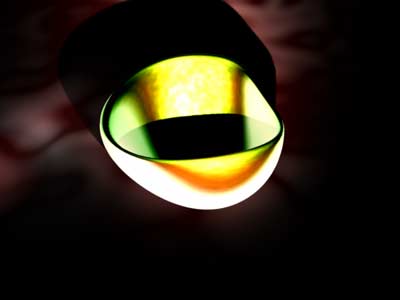
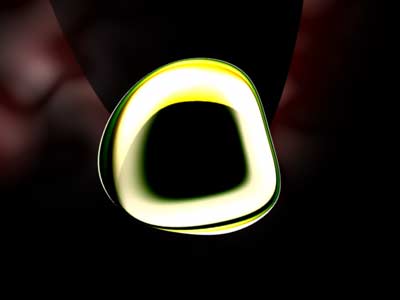
I won't render a cartoon for you here. The sequence below shows the Ramp Shader at work in a more playful way. Note how the colours change depending on where the camera stands.
|
|
Der neue Ramp Shader ist nicht einfach ein weiteres nettes Material in Maya: Er stellt einen Paradigmenwechsel in Sachen Interface dar. Sein Attribute Editor hat ein völlig neues Aussehen, das so überzeugend ist, dass es vermutlich bald auch in den anderen Materialien (wie Lambert oder Blinn) Einzug halten wird. Schön interaktve Regler und Gradientenkurven.
Ich rendere hier keinen Cartoon, sondern einen Behälter, dessen Farbe sich aber auch in Abhängikeit von der Kamera ändert.
|
[18]Mental Integration/Mentale Einbindung
| The best news, of course, is that Mental Ray is free now. The second best news is that it integrates better and better into Maya. I'm personally a fan of Pixar's Renderman but I certainly do appreciate the long tradition and quality of Mental Images' made-in-Berlin software.
The picture above shows how Mental Ray appears in Maya's Plug-In Manager. In the screenshot below the feedback line confirms successful loading:
|
|
Die beste Nachricht ist, dass Mental Ray jetzt kostenlos ist. Die zweitbeste, dass der Renderer immer besser in Maya integriert ist. Ich bin ein Fan von Pixar's Renderman, aber ich weiß natürlich die Kompetenz und Qualität der Berliner Leute von Mental Images zu schätzen.
Der Screenshot oben zeigt, wie Mental Ray im Plug-In-Manager von Maya auftaucht. Die Feedback-Zeile (unten) bestätigt, dass es geklappt hat:
|

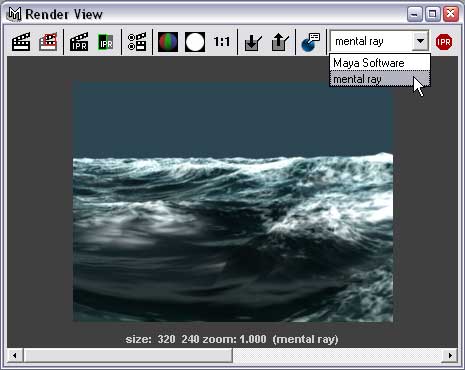
| Mental Ray has its own attribute editor. In its default state, however, it derives all settings from Maya's Render Globals. Mental Ray appears as a new option in the Render window: |
|
Mental Ray hat seinen eigenen Attribut Editor, bezieht aber im Normalfall alle Einstellungen von Maya's Render Globals. Das Rendermenü lässt uns zwischen den beiden Renderern umschalten: |
| Here is a preset ocean I rendered using Maya's built-in renderer (left image); it took about 3 minutes. On the right you see the same scene with the same render settings, but rendered using Mental Ray. It took only 2 minutes. |
|
Links ist ein Ozean, den ich mit Maya's eigenem Renderer gerendert habe, zu sehen; es hat ungefähr drei Minuten gedauert. Daneben dieselbe Szene mit denselben Rendereinstellungen, nur diesmal mit Mental Ray in nur zwei Minuten gerendert. |
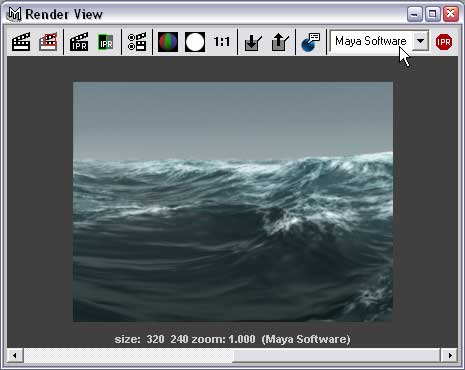
| Duncan Brinsmead, the developer of Maya's oceans, sent me this comment:
"Note that in your render comparison of the ocean, the atmosphere is a fluid node, which is not currently supported in Mental Ray. This also probably explains why Mental was faster in this case. I'm not sure why the foam is so much brighter, offhand, however."
|
|
Duncan Brinsmead, der Entwickler von Maya's Ozeanen, schickte mir dazu folgenden Kommentar:
"Die Szene enthält neben dem eigentlichen Ozean eine Athmosphäre, die mit Fluids erzeugt wurde: Mental Ray rendert Fluids (noch) nicht. Das ist wahrscheinlich auch der Grund, warum Mental die Szene schneller rendert. Warum aber der Schaum so viel heller ist, weiß ich auf Anhieb auch nicht."
|
[17]New Smooth/Neue Weichheit
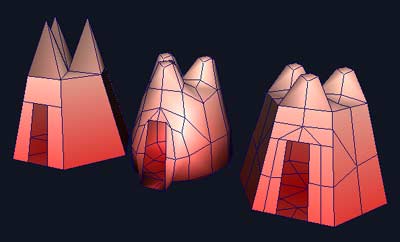
| For most smoothing purposes the Polygon > Smooth command was just fine. Maya 4.5 offers a more sophisticaed "New Smooth" tool with several new features - one of which is the option to keep hard edges while applying the command globally to the whole object.
In the screenshot above you see both Smooth commands in action. I applied the "good old" Smooth command to the left object and got the allround smooth object in the middle. Applying the New Smooth command with Preserving Edges switched on I got the result on the right.
|
|
Zum Weichmachen von Polygonen reichte der lokal und global anwendbare Befehl Polygon > Smooth. Jetzt gibt es das "New Smooth" Werkzeug, das einige Optionen mehr hat, u.a. die, harte Kanten zu bewahren. In der Abbildung oben habe ich den Befehl global auf das Häuschen links angewandt, zunächst mit dem alten Smooth-Befehl (Mitte) und alternativ mit dem neuen Befehl unter Bewahrung der Kanten (rechts). |
[16]Smooth Proxy
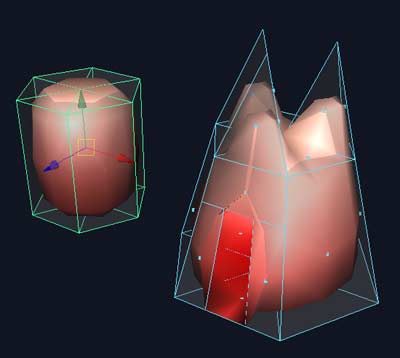
| Smooth Proxy has previously been available as an additional MEL-script. Now it's fully integrated. It performs a simple, yet effective task: While you work on a rather crude polygon object you see a semi-transparent representation of the same object as if the Polygon > Smooth operation had already been applied. In this example I started with a low-res poly cylinder and saw sort-of a stretched sphere (left). I did some extractions, deleted a face and saw the smoothed mini-castle on the right. Smooth Proxy updates continously, so you sort-of see what you might get during all your work. Also, the tool lets you previsualize the results of UV-mapping and texturing easily. |
|
Smooth Proxy bedeutet "weicher Platzhalter". Die Funktion war bisher als separates MEL-Skript erhältlich und jetzt voll integriert. Es tut etwas ganz Einfaches: Während man ziemlich grob und schnell an einem Polygonobjekt arbeitet, sieht man laufend, wie das Objekt später mal aussehen könnte, nachdem man die Kanten abflachen würde (mit dem Polygon > Smooth - Befehl). Im abgebildeten Beispiel fing ich mit einem niedrig aufgelösten Zylinder an, sah diesen aber bereits halbtransparent rot als gestreckte Kugel (links). Nach einigen Skalierungen, Extraktionen und dem Löschen der Tür hatte ich eine Art Burg und sah auch diese entsprechend "vorgeweicht". Auch die Texturierung wird mit diesem Werkzeug schon beim Modellieren berechenbar. |
[15]Shelves Orgy/Shelves Orgie
| Maya 4.5 comes with loads of new icons, organized in a dozen of shelves on the top of the window. If you installed Maya 4.5 over a previous version, you'll probably see the icons of your previous settings. If you want to see the whole wealth of the new shelves, locate the shelves folder on your harddrive, move their contents to another location and run Maya 4.5 again. |
|
Maya 4.5 kommt mit einer Menge neuer Icons, zu finden in einem Dutzend Shelves (Fächer) an der Oberseite des Fensters. Wenn Sie 4.5 über Maya 4.0 installiert haben, sehen Sie möglicherweise nur Ihre alten Shelves. Leeren Sie in dem Fall auf der Festplatte den Maya 4.5 "Shelves" Ordner, und starten Sie das Programm neu. |
| I find the icons nicely designed. In case you don't know that this one will create smoke, just move your mouse over it ;-)
Below you find all icons of the new default shelves listed. I re/discovered several functions by just looking at them and wondering what they might do for me...
|
|
Die meisten Icons sind sehr schön designt. Wer dennoch Text braucht, bewegt einfach die Maus drüber.
Nachstehend sehen Sie alle Icons der Shelves aufgelistet. Ich habe allein durchs Betrachten einige Funktionen wiederentdeckt oder neu gelernt.
|

(Nurbs) Surfaces Shelf

Polygon Shelf

Subdivs Shelf

Animation Shelf

Deformation Shelf

Rendering Shelf

Dynamics Shelf

Fur Shelf

Fluids Shelf

Cloth Shelf

Curves Shelf
| If you ever tried to design icons you know how hard it is to express yourself on the tiny space of just a handful of square pixels. Which icon is your favourite, which one do you think is disfunctional? |
|
Schonmal probiert, ausdruckstarke Icons auf der Fläche von nur ein paar Quadratpixeln zu erstellen? Ich finde es schwer. Welches Icon gefällt Ihnen besonders gut, welches finden Sie völlig daneben? |
[14]Snap Align/Einrasten in einer Ebene
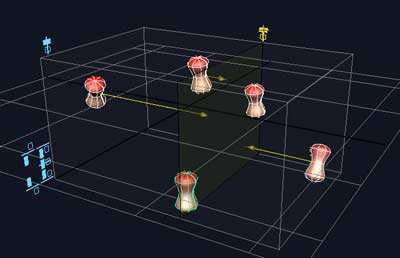
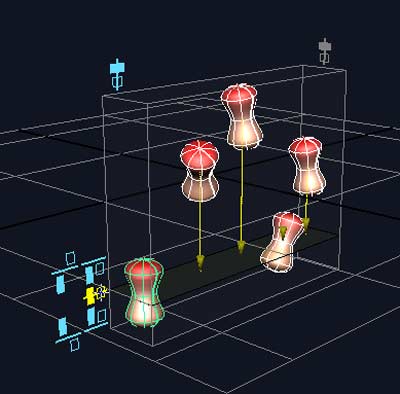
| I do like this new snapping tool; but when I actually work on a scene I tend to forget using it and still do everything manually. The example in the picture above would take a couple of minutes by hand. It takes just a few seconds using the snap align tool.
I created five objects. With all of them selected, snap align brings several blue and green manipulators on the screen. They are self explanatory and only look complicated in the screenshots, not during actual use.
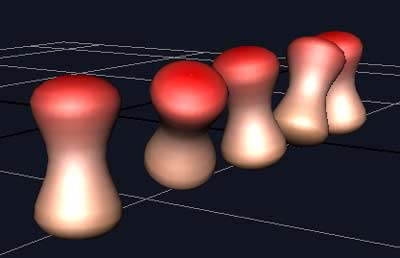
In this case I chose to snap-align three objects on the left and right to the plane near the center objects and in a second step to a single axis. You see the result of the snapping processes in the two picture below.
|
|
Ein weiteres, feines Snapping-Tool, an das ich leider meistens erst denke, wenn ich mit dem Modellieren fertig bin, ist Snap Align. Dabei kann es so hilfreich sein, wie in diesem Beispiel von fünf Objekten, die ich auf einer Ebene und - in einem zweiten Schritt - auf einer Achse einrasten lassen will. Das Werkzeug bietet klare, nur im Screenshot etwas kompliziert aussehende Manipulatoren, um diese Ebenen zu bestimmen.
In dem Beispiel ließ ich zunächst die drei Objekte rechts und links auf die Ebene der Objekte in der Mitte einrasten. Danach rastete ich alle fünf Gegenstände auf eine Achse ein.
|
[13]Floatin' on the Ocean/Ozeanfahrt
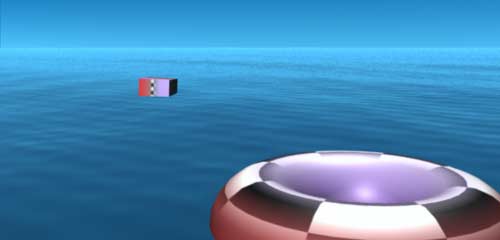
| You need to see the animation [8 seconds, 600k] to appreciate this scenario of two objects floating in the ocean. The ocean scene I use here comes (like several others) with Maya 4.5. It renders fast, contains only one light source and a low-res fluid for the haze.
Now, here's what this encounter is about: There's an option which allows you to make any object float on the ocean. The command creates a locator for each object. The only parameter controlled by the ocean is the translation in Y. In this animation I used some straight forward sine- and cosine expressions for a smooth rotation of the cube and torus.
Please see an additional note concerning this diary entry by Duncan Brinsmead in the Alias newsgroup. Duncan is the developer of the Ocean Fluids.
|
|
Um diese Sache richtig zu genießen, genügt es nicht, das Bild anzusehen. Laden Sie den Film herunter! [8 Sekunden, 600k] Die Szene ist eine Standard-Ocean-Datei, die - neben einigen anderen Presets - mitgeliefert wird. Sie rendert sich schnell, enthält nur eine Lichtquelle und ein niedrig aufgelöstes Gas (Fluid) für den Dunst über dem Wasser.
Aber eigentlich geht es hier ums Schwimmen. Es geht mit allen Geometrien. Maya erzeugt dabei für jedes Objekt einen Locator und animiert damit dessen Auf- und Abbewegung. Alle anderen Achsen sind frei animierbar. Für diesen Minifilm habe ich einige einfache Sinus- und Kosinus-Expressions verwandt, um den Würfel und den Torus etwas lebendiger zu machen.
Eine interessante Zusatzbemerkung von Duncan Brinsmead, dem Entwickler von Mayas Ozeanen zu diesem Tagebucheintrag finden Sie in der Alias-Newsgroup.
|
[12]Wedge Faces/Das Keilwerkzeug

| Before getting too much carried away by Fluids back to the basic novelties of Maya 4.5 like the Wedge Tool. Works on one face like in the picture sequence above or on several faces simultaneously. Simple and powerful. Enough said. |
|
Fluids mal kurz beiseite; es gibt wichtige Neuerungen in Maya 4.5 ganz anderer Art wie z.B. das Wedge Tool, zu deutsch: Keilwerkzeug. Es wirkt auf einzelne Polygonflächen (wie in der Abbildung oben), aber auch auf mehrere gleichzeitig. Starkes Tool. Und einfach. |
[11]Cycling the Fluid Planet/Umkreisung des Gasplaneten
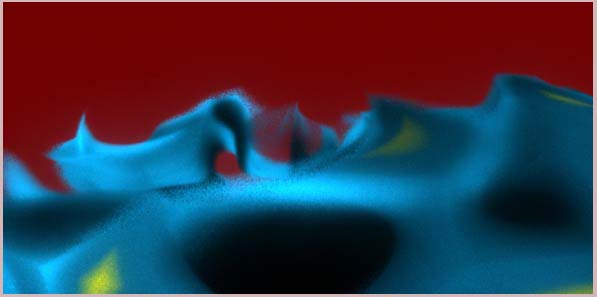
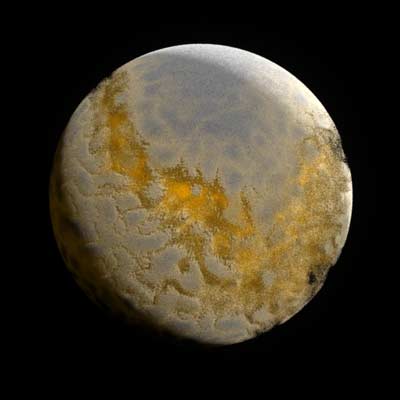
| Years of creativity and curiosity will pass until the wealth of Maya's Fluids will be explored to a decent degree. The more I play with them the stranger this matter gets. The picture above is another example of some non-modeling work. It shows the alpha channel (mask) of a rendered fluid surface. From far away the fluid looks like a planet similar to the ones shown below. But the close look at the surface indicates that this is really a "gas". I've "frozen" it, so it doesn't move, but still, it has these fine, grainy layers of transparency.
|
|
Es wird Jahre brauchen, bis wir die Fluids einigermaßen erforscht haben. Schon mein eigenes, mit wenig Zeit verbundenes Herumprobieren fördert täglich neue, seltsame Ergebnisse zutage.
Sehen Sie sich z.B. das Bild oben an. Es zeigt den Alphakanal (also die Maske) einer gerenderten Fluid-Oberfläche. Von Ferne betrachtet sieht diese wie einer der Planeten weiter unten aus. Aber die Nahaufnahme zeigt, dass es tatsächlich ein Gas ist, wenn auch ein gefrorenes; die feinen grauen Bereiche zeigen die Gasstruktur deutlich.
|
| This is the original colour rendering. With three light sources, the highest anti-aliasing settings and a resolution of 600 x 600 pixels it took 20 minutes to render on a 1.8 GHz P4 machine. Here, of course, it's dramatically jpeg-compressed. And here is the animation: During 8 seconds the camera cycles around and finally dives into the fluffy planet. The movie took a whole weekend (!) to render and is only 800 k using the Divx codec. Hold on tight...
|
|
Das ist das Original, in Farbe. Es brauchte mit drei Lichtquellen, höchsten Anti-Aliasing-Einstellungen und einer Auflösung von 600 x 600 Pixeln 20 Minuten zum Rendern auf einer 1,8 GHz P4 Maschine. Hier ist das Bild allerdings in hochkomprimierter Jpeg-Auflösung zu sehen.
Und hier ist das Sahnehäubchen - die Animation: In 8 Sekunden umkreist die Kamera den Gasplaneten, bevor sie in ihn eintaucht. Es dauerte ein ganzes Wochenende, den Film zu rendern, und am Ende ist er, Divx-komprimiert, nur 800 k klein. Gut festhalten!
|
[10]Subdivs to Nurbs
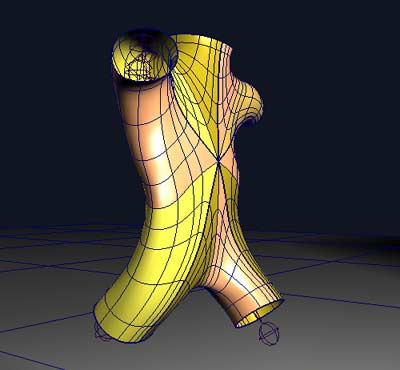
| The picture above shows nothing spectacular, just one more step into the merging of different modeling worlds. It has been an easy and straight forward option for quite some time to convert nurbs or subdivision surfaces into polygon surfaces. What you see here is the conversion of a subdivision surface - modeled in a minute or so - into an ensemble of nurbs surfaces.
I applied the conversion to the character in its neutral position and got a handful of nicely connected nurbs surfaces - depicted in different colours in the screenshot above. Under the skeleton deformation the nurbs-ensemble behaves naturally.
Note: A single nurbs surface with five holes is topologically impossible.
|
|
Der Screenshot oben zeigt nichts Spektakuläres, sondern einen weiteren Schritt beim Zusammenwachsen dreier Modellierungswelten. Die Umwandlung von Nurbs- oder Subdivision-Flächen in Polygonflächen funktioniert in Maya schon länger. Was Sie hier sehen, ist neu: Die Umwandlung einer schnell modellierten Subdivision-Fläche in mehrere Nurbsflächen.
Ich habe das Skelett erst nach der Umwandlung eingezogen. Die Verformungen der (in verschiedenen Farben dargestellten) Nurbs-Flächen funktioniert problemlos.
Anmerkung: Aus topologischen Gründen ist es unmöglich, eine Fläche mit fünf Löchern aus einer einzigen Nurbsfläche zu erzeugen.
|
[9]Glassy Fluid / Gas wie Glas
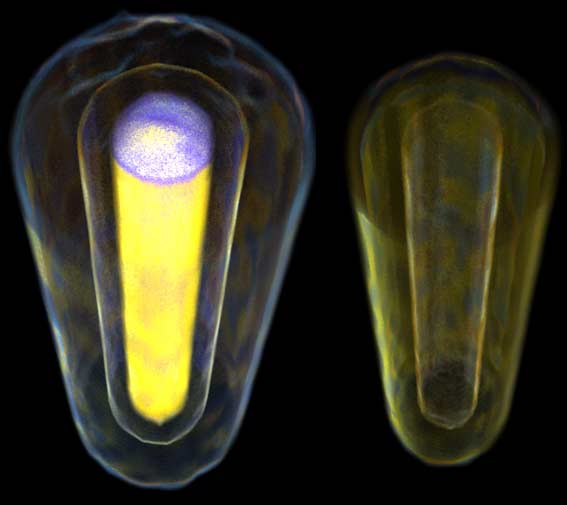
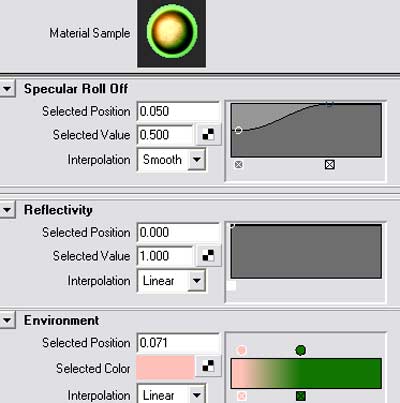
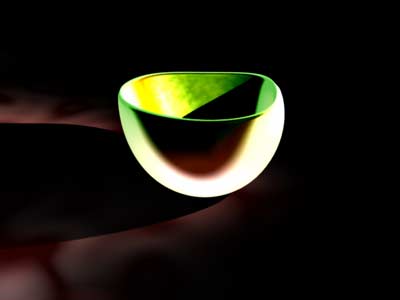
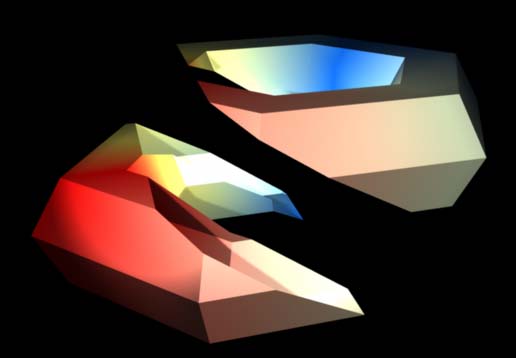
| These two pictures show no geometry at all, just a single fluid - in this case rendered not as volume but as surface. The left side uses the density for both incandescence and opacity of the gas. The right side uses a mix between density and fuel for the incandescence and the temperature for the opacity. The tricky opacity-gradient (below) determines the glass in glass look. |
|
Diese beiden Bilder enthalten keinerlei Geometrie, sondern nur ein Fluid. Das Gas wurde statt als Volume nur als Oberfläche gerendert. Links ist die Dichte des Gases sowohl für die Selbstleuchtkraft als auch Transparenz zuständig. Rechts regelt ein Mix zwischen Dichte und Brennstoff die Selbstleuchtkraft, während die Temperatur des Gases seine Transparenz bestimmt. Die verschiedenen Glasschichten stammen von dem zackenreichen Gradienten (Abbildung unten). |
[8]Solid Fluids / Feste Gase
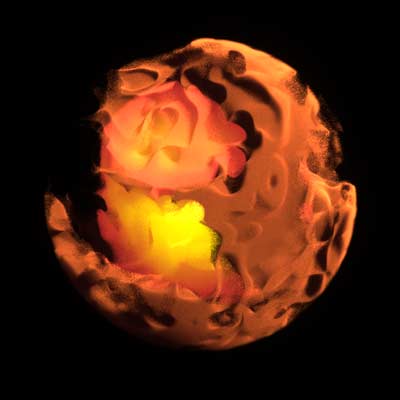
| Friends, let's share this: A planet looking like having gold craters - made with Maya 4.5's fluids! Yes, fluids, or condensed gases if you please. If you wanna know how they were created, please ask my very talented ex-trainee, Christoph. When Maya 4.5 landed on my shelf with a couple of cool solid - yet unexplained - screenshots in the documentation, I asked Christoph to do some research on frozen gases. Two more of his results, all rendered in not too much time, below. |
|
Kleine Sache, große Freude: Der Planet mit der Goldader in der Abbildung oben ist in Wirklichkeit (falls es in der Computergrafik eine Wirklichkeit gibt) ein in Maya 4.5 erzeugtes Fluid Object, also quasi ein kondensiertes Gas. Wie das geht und wie wenig Zeit es zum Rendern braucht, kann Ihnen mein ehemaliger, sehr talentierter Praktikant Christoph Bieselt sagen. Auch die beiden unteren Renderings sind von ihm. |
[7] Let's Snap Together
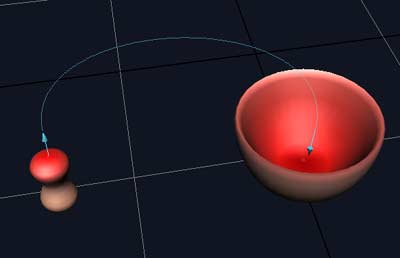
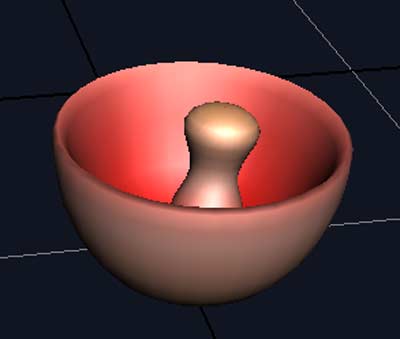
| More snapping in this new version of Maya. You may consider it trivial, but try this: Move and rotate the pestle on the left so it sits comfortably inside the mortar on the right with its red side down. I know, you can, but how many clicks in different modeling views does it take? Here, the new Snap Together Tool comes in. It creates this cool blue line with arrows for origin and target. The result is one click away and shown below. |
|
Gegenstände auf Punkte oder Kurven einrasten lassen ist ein alter Hut. Die neue Version von Maya stellt einige vom Interface her gut gelungene neue Snapping Tools zur Verfügung, wie z.B. Snap Together (auf einander einrasten). Mit Hilfe der blauen Kurve und ihren Pfeilen rastet der Stössel in den Mörser ein, und zwar mit seiner roten Seite unten! Einen Klick später sieht die Sache wie in der Abbildung unten aus. |
[6] Volume Light / Raumlicht
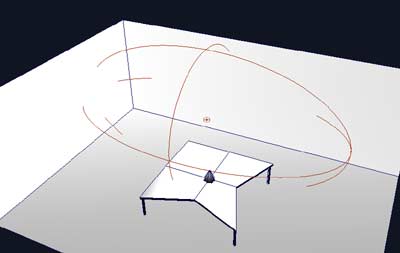
| Technically, the new Volume Light is a hybrid between the directional and the point light. But it "feels" completely different because it's so easy to visualize and manipulate. By default, a sphere serves as the basic shape within which the light develops. But other geometries are possible as well. For example, you can simulate the light coming from a kitchen lamp by using only the lower half of a sphere. Or you can create a light within the shape of a piece of cake by fine tuning a cylindric light shape. |
|
Technisch gesehen ist das neue Volume Light (Raumlicht) eine Mischung aus dem gerichteten, parallelen Sonnenlicht und der Punktlichtquelle. Aber es "fühlt" sich tatsächlich wie ein völlig neues Licht an, weil es so einfach einzustellen ist. Standardmäßig kommt das Volume Light als Kugel an, innerhalb derer es sich ausbreitet. Aber man kann die Kugel auch halbieren, um etwa das Licht unterhalb einer Küchenlampe zu simulieren. Mit einem entsprechend eingestellten Zylinder könnte man die Lichtausbreitung auch auf die Form eines Stück Kuchens einschränken. |
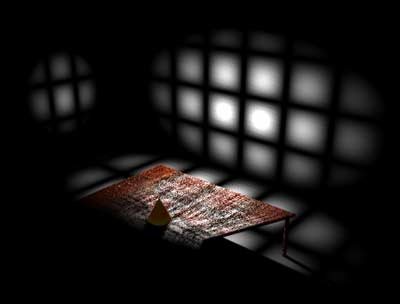
| This is a rendered image of the scene depicted further up. The scaled sphere touches the walls but not the corners of the room - and only half of the table. I mapped a buldge texture to the light's colour. |
|
Das ist ein gerendertes Bild der Szene weiter oben. Die in die Länge gezogene Lichtquelle erreicht Teile der Wände, jedoch nicht die Ecken, und sie trifft auch den Tisch nur zur Hälfte. Hier bestimmt eine Buldge-Textur die Farbe des Lichts. |
| Four intersecting volume lights illuminating the table and creating wonderful shadows. |
|
Hier beleuchten vier, sich überschneidene Volume Lights den Tisch und erzeugen herrliche Schatten. |
[5] Bevel Plus
| Finally a good beveling tool! Derived from a formerly commercial plug-in, Bevel Plus creates wonderful 3D objects from curves. Polys and Nurbs. |
|
Das wurde auch Zeit: endlich ein vernünftiges Bevelling-Werkzeug! Typische Anwendung: Nurbs- oder Polygonflächen aus Kurven herstellen. Das Tool gab es bisher nur als kommerzielles Plug-In. |
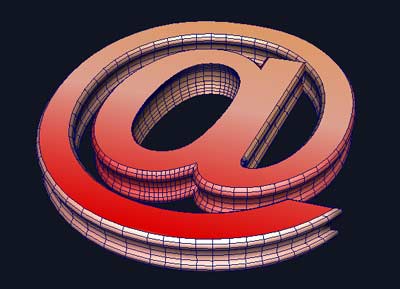
| Above: The @-sign as a 3D object consisting of several Nurbs surfaces.
|
|
Oben: der Klammeraffe als 3D-Objekt, wie ihn Bevel Plus aus zwei Kurven erzeugt. Es besteht aus mehreren Nurbsflächen. |
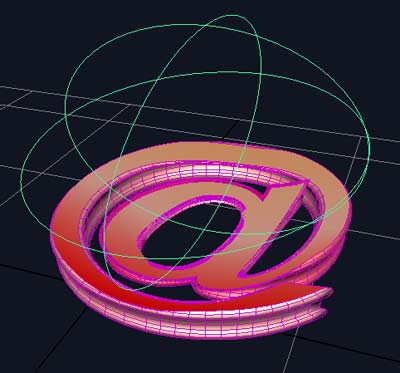
| Even under the influence of a Sculpt Deformer this collection of surfaces looks good. |
|
Diese Nurbsflächen bleiben auch unter dem Einfluss von Verbiegungen (hier: der Sculpt Deformer) intakt. |
[4] Oceans / Ozeane
| A wild 3D ocean in just 2 clicks - takes ages to render, though. Click on the image to see the animation [1 MB, avi, divx]. You'll notice the camera diving underneath the water surface at the end. |
|
Ein wilder Ozean aus der Maya 4.5-Voratskammer in nur 2 Klicks. Klicken Sie auf das Bild, um die Animation zu sehen [1 MB, avi, divx]. Gegen Ende des kurzen Films taucht die Kamera unter. |
| There's an impressive Ocean submenu under Maya 4.5`s Fluids - although the ocean has nothing to do with fluid dynamics. It's based on a new "Ocean" shader and displacement mapping. |
|
Das Ozean-Menü findet sich unter den Fluids, obwohl Mayas neue Ozeane nichts mit Strömungslehre zu tun haben. Sie basieren auf einem Displacement Mapping und einem neuen "Ocean" Shader. |
| An excerpt of the new ocean shader. You find the new attribute design with ramps handy next to the parameter fields in many areas of Maya 4.5. |
|
Ausschnitt aus dem Ocean Shader. Dieser und zahlreiche andere Attribute Editoren in Maya 4.5 enthalten Farb- oder Graustufenverläufe. |
| When you render the whole ocean you see this dull blue object. You need to get closer: |
|
Wenn Sie den Ozean, so wie er in der Szene ankommt, rendern, sehen Sie diese etwas armselige Ellipse. Sie müssen schon näher kommen: |

| And of course (thanks to Duncan Brinsmead who demonstrated this already several years ago) you can add bouys which nicely sway in the water. |
|
Und - dank Duncan Brinsmead, der diese Sache schon vor einigen Jahren vorgestellt hat - kann man natürlich Bojen ins Wasser setzen, die dann schön darin herumzappeln. |
[3] A Fluid explosion / Eine Gasexplosion mit Fluids
| The Maya 4.5 docs suggest - for good reasons - to use fluid templates and modify them to your needs rather than starting from scratch. At this point (late beta stage) the library is still tiny, the web library non existent. |
|
Die englischsprachigen Fluid-Tutorials empfehlen nicht ohne Grund, Simulationen nicht unbedingt von Grund auf selbst zu erstellen, sondern sich vorgefertigter Dateien zu bedienen und sie nach den eigenen Bedürfnissen zu modifizieren. Im Augenblick (Ich arbeite mit einer Maya 4.5-Vorab-Version) ist die Bibliothek auf der CD winzig und die im Netz noch gar nicht freigeschaltet. |
| Example: Under Explosions there's currently only one object listed. I used the middle mouse button and dragged the icon into an empty scene. |
|
Zum Beispiel findet sich im Verzeichnis "Explosions" derzeit nur eine einzige Explosion. Ich ziehe diese bei gedrückter mittlerer Maustaste in eine leere Szene. |
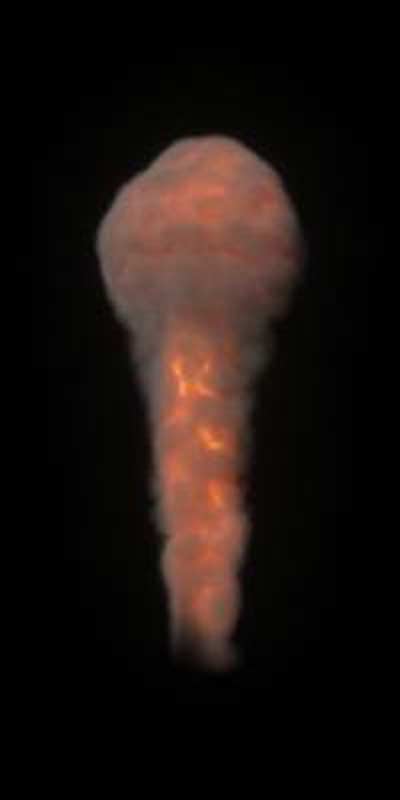
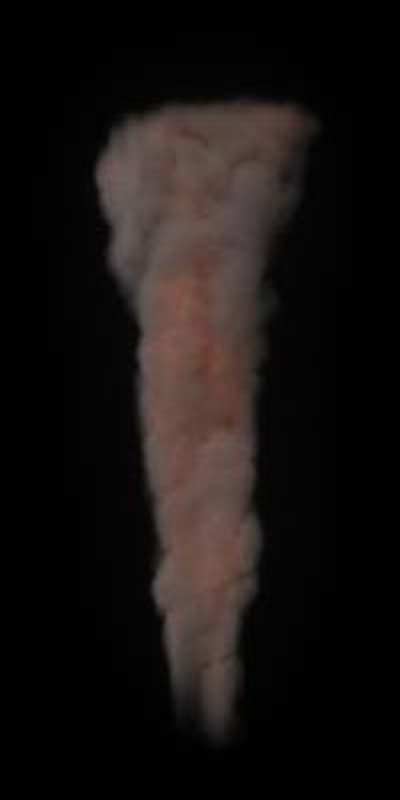
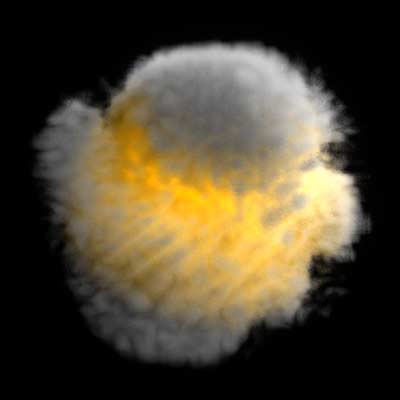
| These are two rendered images of the gas explosion. The resolution of the gas is very high, so run-up and rendering is very time consuming. You would usually try out the scene at much higher speed using much less gas particles and a run-up cache.
You find a playblast (not rendered!) animation of the scene here. Both the playblast and the rendered images demonstrate that the whirling, steaming, mixing, interacting effects of "fluid" particles can not be achieved by conventional particles.
|
|
Das sind zwei gerenderte Bilder aus verschiedenen Phasen der Explosion. Weil das Gas dieser Szene aus sehr vielen Partikeln besteht, dauert das Hochlaufen der Simulation und das Rendern relativ lang. Man wird in der Regel mit einer niedriger aufgelösten Variante und einer ge-cache-ten Simulation beginnen, um eine bessere Performance zu bekommen.
Einen Playblast der Animation (also nichts Gerendertes!) sehen Sie hier. Auch er zeigt bereits komplexe Teilchenbewegungen, wie sie mit konventionellen Partikeln nicht zu erreichen ist.
|
[2] 2D Fluid
| Fluids are the major new feature in Maya 4.5. I was highly impressed seeing a gas rise and develop under the laws of fluid dynamics. The menu is impressive, too. |
|
Die Simulation von Flüssigkeiten und Gasen ist die große Neuerung in Maya 4.5. Es hat mich schwer beeindruckt, mein erstes Gas nach den Gesetzen der Strömungsmechanik aufsteigen zu sehen. Auch das Menü der "Fluids" ist beeindruckend. |
| The 2D container is a neat way to try out fluid simulations quickly in (close to) real time. Nothing happens until you hit the playback button... |
|
Der 2D-Behälter bietet eine nette Möglichkeit, Simulationen schnell auszuprobieren. Erst wenn man den Play-Knopf drückt, beginnt die Szene zu leben... |
| After a few frames a dot of fluid particles develops in the middle of the container and then rises to the ceiling. I used a color ramp to display the density of the gas: Thin areas are blue. |
|
Nach ein paar Frames ist ein Punkt in der Mitte des Behälters zu sehen, der sich zur Decke hin ausbreitet. Ich habe einen Farbverlauf mit der Dichte des Gases verbunden: An den blauen Stellen ist das Gas dünner. |
| After about 100 frames the simulation shows an almost stable structure. The emitter keeps creating new gas which eventually gathers at the top of the container. |
|
Nach etwa 100 Frames zeigt die Simulation eine einigermaßen stabile Struktur. Der Emitter stößt nach wie vor Partikel aus, die sich alle im oberen Bereich des Behälters sammeln. |
| You can add as many emitters to a container as you want. The following two pictures show five emitters in a 2D-box. |
|
Sie können soviele Emitter in einen Container tun, wie Sie wollen. Die beiden folgenden Bilder zeigen einen 2D-Behälter mit fünf Emittern. |
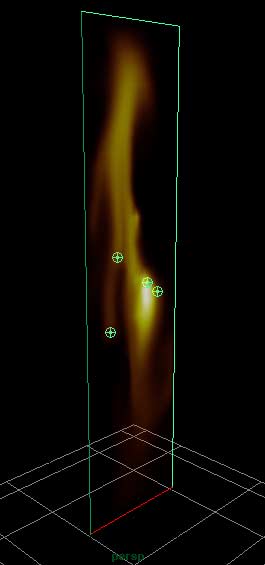
| 50 frames have passed. |
|
50 Frames nach Beginn |
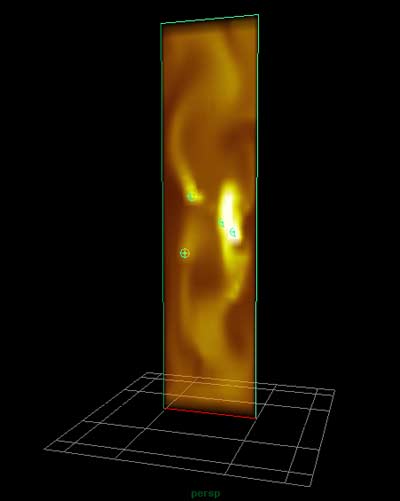
| At frame 300 the gases of the five emitters strongly interact. |
|
Nach 300 Frames vermischen sich die Gase der fünf Emitter stark. |
| Click here to see a rendered sequence of another, very simple 2D fluid simulation with a moving camera. I added some turbulence and played with viscosity.
Format: avi, divx codec, 0.7 MB.
|
|
Hier finden Sie die gerenderte Sequenz einer anderen einfachen 2D-Fluid-Simulation mit bewegter Kamera. Ich habe das Gas diesmal mit Turbulenz aufgemischt und die Zähigkeit verändert.
Format: avi, divx codec, 0,7 MB.
|
[1] Poly Cut / Poke Faces
| In other packages of 3D modelling software this is called the Knife Tool. It cuts whole polygons or selected faces along a drawn line in two parts. Previously available as a plug-in, this tool is now integrated in Maya. |
|
In anderen 3D-Programmen wird diese neue Funktion das Knife Tool (Messer) genannt. Es schneidet ganze Polygone oder ausgewählte Polygonteilflächen (Faces) entlang einer Linie entzwei. Bisher als Plug-In erhältlich, jetzt in Maya integriert. |
| In most cases you will use the knife tool in an orthogonal view. Here I applied it in the perspective view to the whole polygon torus. |
|
Normalweise wird man das Schneidewerkzeug in einem der orthogonalen Fenster anwenden. Ich zerschneide hier im Perspektivfenster den Polygontorus in zwei Teile. |
| There are several options available for controlling the cut. Here I set Extract Faces to On and thus separated the two pieces of the poly torus from each other. |
|
Es gibt zahlreiche Optionen, wie sich der Schnitt auswirken soll. Hier habe ich Extract Faces eingeschaltet und dann die beiden Schalen räumlich voneinander getrennt. |
.
| Above: A rendered image of the cut torus. |
|
Oben: ein gerendertes Bild des zerschnittenen Torus. |
| A related new tool is Poke Faces. It does a simple, yet powerful job by splitting single or multiple polygon faces so pokes can be extracted: |
|
Der ebenfalls neue Befehl Poke Faces unterteilt einzelne oder mehrere Polygonflächen, um aus ihnen Spitzen und Zacken herauszuziehen: |
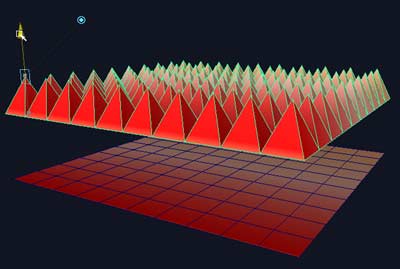
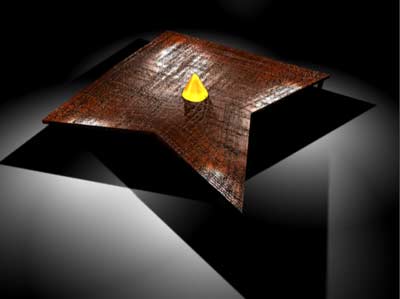
| Buttom: the original surface, a flat polygon plane with 10 x 10 divisions. One click later it becomes that poky piece above. |
|
Mit nur einem Klick wird aus der unteren planaren Polygonfläche die pickelige Fläche oben (Poke = Pickel). |
Visit Jos Stam's - the inventor of Maya's Fluids - website
See the Making of Fluids video online
Home